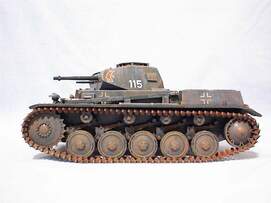
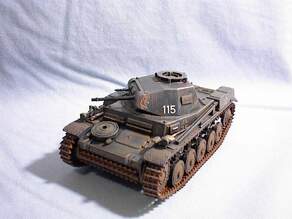
Tamiya's 1/35 PzKpfw II ausf F
by Mark Dice

Background:
In 1934, with the slow development and production of the Pzkpfw III and IV, which were to be the German Army's main battle tanks, the Ordnance Department decided to develop a new tank to fill the gap. Specifications called for a tank weighing under 10 tons, crew of three, armed with a 20 mm Kwk 30 cannon and 7.92 mm Mg 34 machine gun (for this period the 20 mm gun was considered adequate for the required armor piercing performance).
The first production models were begun in 1935 with numerous armor, drive train, and engine improvements made during the various production series (Ausf. A thru C) up to the beginning of WWII when the German Army had 1,226 of all types of the Pzkpfw II. Despite the fact that deficiencies in armor and firepower had become apparent, the Pzkpfw II proved adequate in Poland and France as the major single type of tank in the Panzer divisions (more through superior tactics and training than firepower/armor). This led the German High Command to believe the tank a success and order further production in 1940 of the Ausf. F version again with improved armor, drive train and later the Ausf. G/J with better storage, armor, and a slightly improved gun, 20mm Kwk 38. In 1938-9 the Ausf. D/E versions were developed as a fast reconnaissance vehicle but proved disappointing in this role and were later converted to Flammpanzer II flame-thrower tanks and Marder II tank destroyers later in the war.
There were over 1,060 of the various Pzkpfw II's available for the opening of the invasion of Russia and it was there that the armor and firepower deficiencies became plainly obvious when the heavier armed and armored tanks of the Russians were encountered. From 1942 on, large numbers of the Pzkpfw II's were converted to Marder II tank destroyers and Wespe self propelled artillery.

The Kit:
This is one of the "old" Tamiya kits that were designed to be motorized.
There are two tan trees of parts for the tank plus one crewman (approx. 60 parts plus the two one piece long dark gray flexible tread parts and numerous poly caps for the road wheels, remember it's supposed to be motorized) and two tan trees of parts of figures depicting 5 Africa Korps Infantry on the advance.
The instruction sheet is 7 ½ X 20 ½ " with a short history of the tank, it's use in North Africa, and figure painting instructions on one side and construction steps for the tank and figures on the other (a mere five steps to build the tank).
There is also a 7 ½ X 10" sheet for a painting guide and decal placement. 5 versions are possible, some panzer gray and some in the Africa Korps scheme's. Decals come on a little 2 X 2" card and look average in colors and register and they look thick!
Construction:
I pulled this kit out cause I thought it would be a quick fun build OOB with no frills or bells and whistles… And it was!! Overall assembly only took a couple of evenings. I spent more time waiting for the Future and paint to dry than anything else.Note: almost all the parts had seam lines and often ejection pin marks that were cleaned up prior to being assembled. All the figures were tossed into the spares box cause I'd chosen to build a dark gray France/Russia version and they were all dressed for the desert.
First of all, the motorization holes in the bottom of the tank were filled with super glue and sanded smooth. Then the lower tank hull was assembled. Next, I assembled all of the wheels, washed them and when dry, I put them on toothpicks for painting. The wheels for the most part do not have any detail on the backside, I planned to hide this with "mud". The turret and upper hull were assembled now per the instructions.
The upper hull has several problems that many modelers would probably fix, such as the fenders are too thick for scale, ejection pin and location holes for other parts and big cavities where raised detail such as cargo boxes on the underside of the fenders were easily visible, etc. I figured the tracks would hide most of these flaws when finally assembled and just let them go… (supposed to be fun, remember?)
The upper and lower hulls were joined together and any last glaring errors/glue smears were cleaned up.
The ends of the cannon, machine gun and exhaust pipe were drilled out. And the turret and hull were washed and let dry.
